Wednesday, December 26, 2012

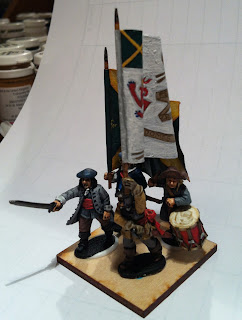
George Mackenzie, 2nd Earl of Seaforth

Command base representing George Mackenzie, 2nd Earl of Seaforth.

Although on good relations with the king, Seaforth had come out on the side of the Covenant during the Bishops, leading the forces north of the Spey.  However, the convenanters suspected his loyalty and  he was temporarily imprisoned.  Perhaps the kirk had good reason for this, for not long after he entered into a bond with Montrose amongst others to support the king.  Yet again, Mackenzie seemed to play both sides, turning down the kings offer of becoming Chief Justice General of the Isles, then siding with the government after Montrose won the Battle of Justice Mill's in September 1644.

Montrose captured Mackenzie during the winter campaign, but he was released having sworn allegiance to the king and promising never to take up arms against Montrose.  True to form, Mackenzie then joined with Hurry (!), taking command of the northern clans and local regiments. In Macrae's account of the battle, he suggest's that Mackenzie and Montrose had been in communication.  Indeed, in the descriptions of the fighting, Mackenzie's northern regiments are not mentioned - perhaps being held back, as the certainly emerged pretty much unscathed.

Not long after this, after turning down another commission by the government,  Mackenzie came out for Montrose and the king, joining them at the siege of Inverness. By November he had left for Norway, not long after Montrose's defeat at Philliphaugh.

For the game, Mackenzie will probably get a low command rating (in Pike & Shotte) of 6-7, making it hard for the units under his command to fully commit to the fight.


Saturday, December 15, 2012

Sir James Halkett's Regiment of Horse


Raised in Fife, Colonel Sir James Halkett was a staunch Covenanter and elder of the local Parish. By November 1644 it had moved north and was essentially brigaded Balcarres’ Horse. After fleeing Aberdeen, the two regiments were chastised for lack of vigor in pursuit of Montrose after the recapture of Dundee.  Carrying on the pursuit they harried Montrose’s forces up Glen Esk, inflicting casualties along the way and preserving the local populace from the plundering of the Royalist’s.
After Joining Hurry on Aberdeen, it proceeded to Auldearn where it formed part of the reserve of Hurry's army.  Although able to escape (due to being mounted), the troop was still roughly handled. 
It continued on, serving on the left of the government forces at Alford.  However, by the 10th of July, the losses it and Balcarres’ regiment had accumulated resulted in their amalgamation.  The combined regiment received fresh recruits in time for Kilsyth, but at the end of the battle it was a spend force and disbanded altogether.

Detached from the main field army in England to deal with Montrose, Halkett's were the best of Hurry's cavalry.  The regiment should be 16 figures strong but I'm going to paint a unit of lancers later, and then use them for the second rank.

Again couldn't find much on the regiment and certainly not the color. Overshadowed by later generations of Halkett's, the family crest was overly complicated, so I've simplified it and added the motto into the coronet.

With the completion of this unit, I'm 2/3rds of the way through my part of the project!  Hopefully, 2013 will see an end to hodden grey!


Rear Rank


Coronet


Saturday, November 10, 2012

Findlatter's Regiment

Raised by the James, 1st Earl of Findlater from his kinsmen, friends, tenants and servants in May 1644, he served with Argyll in the north.  Unfortunately, this left his lands around Banffshire unprotected, as his lands were sacked and his wife saved their home only by paying Montrose ransom.  With his men, he joined Hurry, no doubt looking for revenge .  However, with defeat at Auldearn, he and his men disappeared from the history books no doubt licking their wounds and reflecting on becoming embroiled in local politics!

The Earl of Findlatter's estates where around Banff and Buchan, indeed the ruin of Findlatter castle hugs the northern shore hereabouts.  At the time of the battle, the Earl was an Oglivy.  This in itself is interesting, as the Ogilvy's were staunch supporters of Montrose.  As in many civil wars and rebellions, many families played both sides of the fence, not because they were riven by family strife, but to try and ensure that the "family" would always be on the winning side.  As we'll see in later post's, the covenanters force, though numerically superior, contained a fair proportion of troops whose leaders may have had little loyalty to the cause.

The standard thus has the Ogilvy Lion which is part of the present crest of Banff.  Perhaps easily identifiable to their kinsmen on the Royalist side!  The unit has been painted the usual mix of hodden greys, with a red/black plaid holding the unit together.

Its around 8 figures over-strength for Aulderan (see the Northern Levies too), but this gives me some room to play with for normal games.


Photo's not the best - wee bit to much sun and taken on the iPhone.

Wednesday, October 17, 2012

Covenanter Flags - How it's done

Been a couple of questions about flags flying around (why waste a good pun), so I thought I'd do a step by step guide to the approach I have.  Walter's an expert with the computer but I went the old fashioned way (well I don't have photoshop) and painted all mine.  It's a compromise between mediums - paint and foil offer modeling possibilities at the expense of image clarity - paper flags touched up with paint offer much sharper images but the flag is stiffer. Either way our flags have been getting a lot of great feedback so thanks to everyone.

First up - flags may be made from symetrical polygons of material but unless you plan to plant it on the moon it will never stand completely proud from the pole, even in a strong wind.  This is due to the cumulative weight of material working with gravity.  Next time your out have a look - all flags drag/droop yet on the wargame's table most flags look like Neil Armstrong's!

In both methods we skew the image to get a false drop, which goes a long way to mimicking this effect.   On the computer this is relatively straight-forward but on foil....read on.

Most of the Covenanter Regiments at Auldearn are poorly known, with little, if any info on their banners.  So within the realms of reason I've tried to come up with sigils that are tied to the local clans, lairds or use common national symbols.

I start by drawing these on the non-deformed polygon and grid it up so I have a guide when drawing it on the foil.


These are the Colonel's Colour's for Findlatter's and Buchanan's - I'll write up why I chose the designs and colour when I write up the regiments. 


I prep the foil carefully, smooth it and prime it with white paint - this allows a surface which cnd be drawn on and to which the paint will adhere.  The whole grid is slid to get the drop, so everything stays in the same relative place - making for a slightly out of shape image on the detailed parts (see the lion).  Drawing on the foil leaves grooves - be aware when applying the paint - and be careful in the final stages (see later).


Here's the Regimental standard - a dropped saltire - no text is done at this stage. 


As with the troops, I build up the colour's by layering.  Key here is to get good edge definition and make sure it is a dark edge (so in effect you work inwards).


Keep the lines sharp - go back and touch up if necessary - keeping it neat.  This saves a lot of work later on.


Second layer - brings out the definition on the scrolls, again keeping it neat is important.  Leave the crease's round the pole!


Saltires start to come to life - wee bit darker around the edges of the block colour's helps sharpen the edge effects.


Final layer - now you see the white - making it a wee bit streaky rather than solid flat will help with the texture.  Additional, highlight's can be applied to bring out subtle details.  Painting the text is a bear, but a steady hand and the ability to go back and touch up make it ok.  Don't be afraid to paint over the whole text and do it again. 


At this point I'm usually wishing they had just used that traditional slogan of "F*#k the Pope".  Again the neater the better, dont seat it if it's squint though - it all gets bent again when its folded so you don't notice it too much in the end.

At this point, turn the foil over and use a spoon to smooth out all the indents made when you drew the design. as the paint is thick and still somewhat flexible it heal's well.

Turn it over and apply a layer of varnish - this seals the paint - I use an old bootle of armory matt varnish (which looks more satin) but this helps keep the paint in good condition - the whole thing gets dull-coated down anyways.


Mount the flags on the poles.  Make sure the whole face is glued - normal wood glue works best.  Pay attention to the staff seams and spend time smoothing out out.  Already you can see the drop - looks more flag than square now. 

At this point go round the edges and touch up the paint - I cut with a knife rather than scissors, using a metal straight edge.  It's sharp but you still end up seeing the foil.  If you have big overlaps trim with a scissor.  I see so many good flags (Little Big Man in particular) ruined by silver edges.  It only takes two minutes.

Pay attention to the staffs, especially at the flag staff join.  Key thing here is that Civil War flags where on short poles, so cut them down.  The ensigns waved them about one handed - so its not the pole you have outside your local hotel!

Before you mount it on your standard bearer do the folds.  I uses a brush handle and fold the flag round it. Keep the folds smooth and curved - this stops the paint cracking.  I like to fold at and angle but you can play with this and also with the squeeze to control the tightness.


So here's the finished article.  Even though the figures are done - don't stick them down until you have played with the vertical space.  Also remember, the pike block is behind you, so of its pikes at the ready get your command base sorted then fit your pikes around it.


All the photos where done with the phone so not the best.  However, you can see that the folds and the drop now combine to hide the worst of the painting gaffs.

Monday, October 1, 2012

Gordon of Monymore's Pike - WIP II

Made some good progress on Monymore's Pike over the last weekend. Thought I'd share the work so far. Finished almost all of the tartans, with just a couple of green based tartans to go. Even though this will be a regular pike and shot regiment, I wanted this unit to look like a highland unit so I have included a proportion of highland models, and have also painted most of the lowland models with tartan breeks. 

In addition to the last couple of tartans, I have just hair, pikes, flags and the odd detail (e.g. drum, officer sashes) to complete before basing. I also have 4 other pike models that are complete but not photographed yet.


The first stand of pike


Second stand of pike


Regimental command

Below is a close up of some tartans. The drummer and highlander with great sword both have the same red base, but it is interesting how the yellow overstripe on highlander (rightmost model) changes the apparent base colour making it look more brown. Worth remembering as this trick may make it easier to paint a lot more apparent variety than there actually is, just by varying the overstripe colour.


 The model on the right is the Perry command figure I am planning to use as Monymore himself. I am having some doubts though as he seems a little too "lowland" so I am considering replacing him on the command stand with the Old Glory Highlander below left. He is an excellent model and would work well as a highland gentleman Colonel. The model was sculpted with a philabeg (modern kilt) rather than a plaid, so I have added a belted plaid with greenstuff that should look pretty good once painted. I'll let you know what I decide. If any followers have strong opinions on which way I should go please comment below.


I am quite happy with the plaids on this batch, and have definitely learned a lot while painting MacColla's Lifeguard. The tartans took a lot less time, and I personally think the colour choices work pretty well, which is great for my morale as I have another 24 shot models primed and ready to go next, and they are mostly highlanders.

The rest of the photos below are front and back close ups of each pike model...